6 Options to Transfer Photos from Pixel to iPhone 16/15/14/13/12/11
"My friend (iPhone 16, I guess) and I (Pixel 8) want to share photos we took with each other. We use some messaging app that allows it. But it's a hassle selecting and transferring." -- from StackExchange
Typically, switching to a new iPhone is exciting, but ensuring your important data, like photos, makes the transition seamless is a must. Preserving important memories during this process can often seem challenging, especially when you want to avoid manual processes or face technical issues like incomplete transfers.
This passage lets you know how to transfer photos from Pixel to iPhone efficiently with 6 great options. To gain further insights, continue reading.
![]()
Part 1: How to Transfer Photos from Pixel to iPhone via USB
> 1.1 Using Phone Transfer
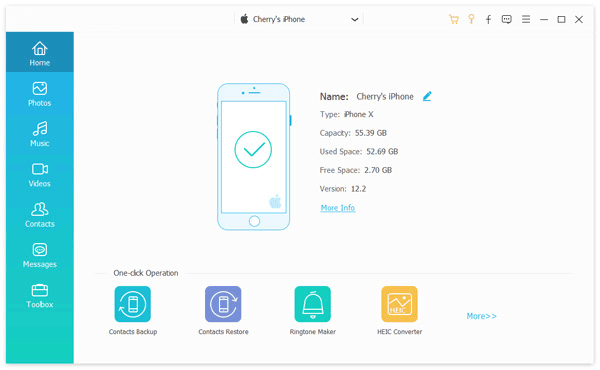
Some may wish to move photos from Pixel devices to iPhones while preserving the original quality. To facilitate a smooth transfer, you're advised to utilize Phone Transfer, a dedicated tool designed for efficient data migration.
This outstanding product enables seamless data transfer between devices (Android/iOS) and supports the secure and straightforward movement of various file types, such as contacts, photos, videos, music, audio, and more, ensuring data integrity is maintained.
Additionally, it is compatible with nearly all mobile devices, including those operating on the latest system versions.
User Manual:
- To initiate the process, first download and install the software on your computer.
- Connect your Pixel phone and iPhone 16/15/14/13/12/11 to the computer using USB cables, following the instructions provided.
- After establishing the connections, proceed by adhering to the on-screen prompts to ensure that the software correctly identifies both devices.
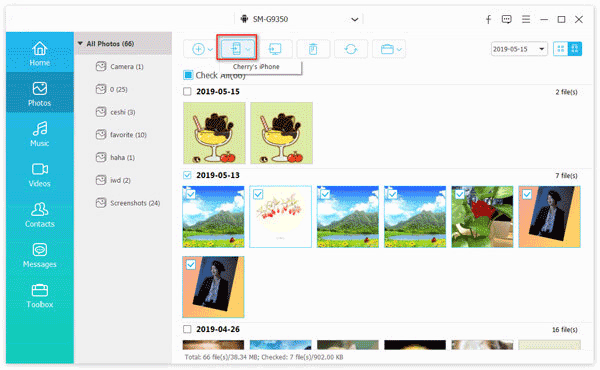
- The interface will showcase your Pixel device. In the event that it does not appear, utilize the dropdown menu to select the correct source device.
- From the list of options, choose "Photos" and identify the specific images you wish to transfer.
- After making your selections, click the "Export to Device" button to begin the transfer process.
Drawbacks:
- Requires a purchase or subscription for full functionality.
- Must use a computer as an intermediary.
> 1.2 Using iTunes
If you're familiar with iOS, iTunes needs no introduction. It's a comprehensive media management tool developed by Apple for iPhone users to manage content like photos, music, movies, and more. To transfer images from Pixel to iPhone via iTunes, first, manually copy the pics to your computer.
User Manual:
- To establish a connection between your Pixel and Windows, utilize a compatible USB cable.
- When a notification appears in the tray, select "File Transfer."
- Create a new folder on your PC to import the photos from your Pixel device.
- Afterward, disconnect the device and connect your iPhone to the computer using the USB cable.
- Open the most recent version of iTunes on your computer.
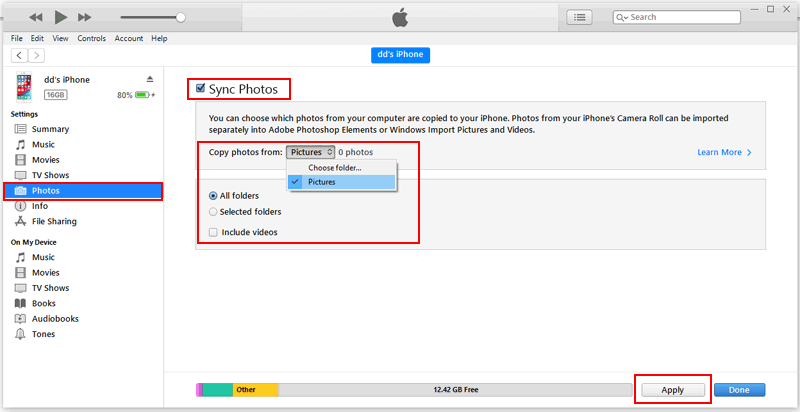
- Go to the "Device" tab and find the "Photos" option in the sidebar.
- Select "Sync Photos" and check the box next to "Copy photos from" to specify the folder containing the Pixel photos.
- Finally, click the "Sync" button to complete the process.
Drawbacks:
- Requires manual copying of photos to a computer and then syncing with iTunes.
- Only works with media files, and photos need to be organized properly on your PC.
- The process can be confusing for users unfamiliar with iTunes.
Part 2: How to Send Photos from Pixel to iPhone Wirelessly
> 2.1 Using Move to iOS
If you just got a new iPhone and haven't set it up yet, you can transfer photos from your Google Pixel to your iPhone using the Move to iOS app. This Apple tool makes migrating data like texts, contacts, photos, videos, and more easy and seamless.
User Manual:
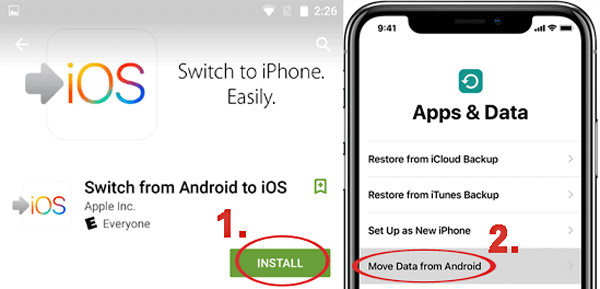
- On your Pixel phone, open the Google Play Store and search for "Move to iOS."
- Install the app, turn on your iPhone, and start the initial setup.
- When you reach the "Apps & Data" screen, select "Move Data from Android".
- Open the Move to iOS app on your Pixel and follow the on-screen instructions.
- Tap "Continue", then read and accept the terms and conditions.
- On the "Find Your Code" screen, tap "Next".
- On your iPhone, tap Continue, and a 6-digit or 10-digit code will appear.
- Enter this code into your Pixel phone.
- After entering the code, the devices will connect via a private Wi-Fi network.
- On your Pixel, select "Camera Roll", then tap "Next" and follow the instructions to complete the task.
- After the setup, you can find your transferred photos in the Photos app on your iPhone.
Drawbacks:
- Requires both devices to be on the same Wi-Fi network, and the transfer can be slow.
- Move to iOS might be interrupted due to unexpected reasons.
- Mainly works during the initial setup of the iPhone.
> 2.2 Using Google Photos
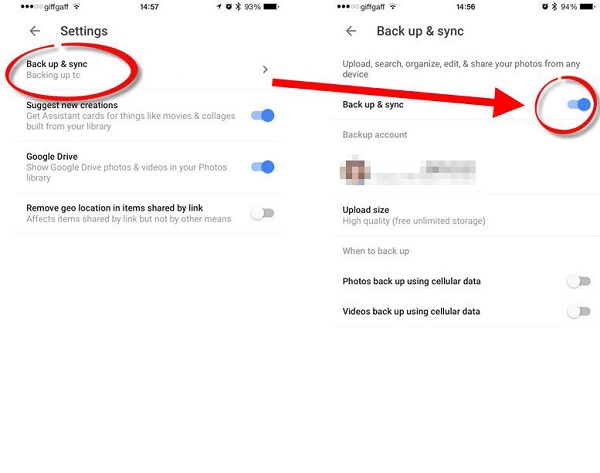
Google Photos is a cloud storage platform that allows you to store and share data from your Pixel. You can upload photos to Google Photos and then access them on your iPhone. Simply install the Google Photos app on both devices using the same Google account before use.
User Manual:
- Begin by signing in to your Gmail account on your Pixel phone after opening Google Photos.
- Navigate to the "Settings" menu and enable the "Backup & sync" feature, which will allow your photos to synchronize with your Pixel device.
- On your iPhone, download and launch the Google Photos app, then sign in using the same account associated with your Pixel phone.
- Select the images you wish to save to your iPhone, tap on "Share", and then select "Save xx images" to download them to your device.
Drawbacks:
- Requires a stable internet connection for uploading and downloading.
- Google Photos has limited free storage; users may need to pay for more space.
> 2.3 Using Dropbox
If you want to transfer photos from Pixel to iPhone wirelessly without Google Photos, Dropbox can help. It allows you to upload files from your Pixel and download them to your iPhone. However, uploading large folders can be time-consuming.
User Manual:
- On Pixel: Open the Google Play Store, search for Dropbox, and install it.
- On iPhone: Go to the App Store, search for Dropbox, and install it.
- Open the Dropbox app on your Pixel and sign in or create an account.
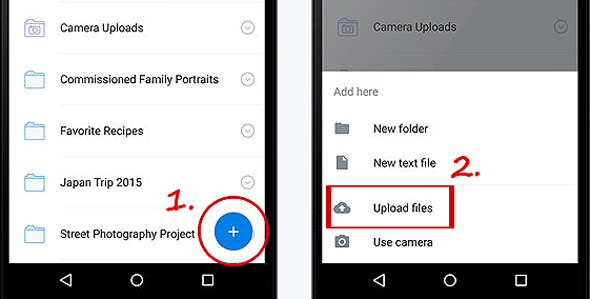
- Tap the + (plus) icon and choose "Upload files".
- Select the photos you want to transfer and tap "Upload".
- Open the Dropbox app on your iPhone and sign in with the same account used on your Pixel.
- Locate the photos uploaded from your Pixel in the "Photos" folder.
- Tap on a picture, pick the three dots, and select "Export > Save Image" to download the photo to your iPhone.
Drawbacks:
- You must manually upload and download photos, which can be slow for large files.
- Free storage is limited.
> 2.4 Using Copy My Data
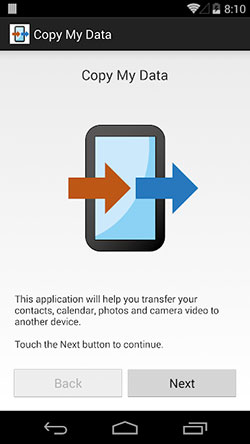
Last but not lease, you have the option to utilize Copy My Data for transferring data between devices, especially from Android (like Google Pixel) to iPhone. This smart app enables you to copy files like contacts, calendars, photos, videos, and more.
User Manual:
- On Pixel: Open the Google Play Store, search for "Copy My Data," and install the app.
- On iPhone: Go to the App Store, search for "Copy My Data," and install the app on your iPhone.
- Ensure both your devices are connected to the same Wi-Fi network, as the app uses Wi-Fi to transfer data.
- On Pixel: Open the app and tap "Next" to proceed.
- On iPhone: Open the app and tap "Next" as well.
- On both devices, select the option "To or From Another Device Over WiFi" to start the connection between the two phones.
- On your iPhone, select your Pixel device from the list of available devices.
- A security code will appear on one device. Make sure the same code appears on both devices to confirm the connection, and then tap "Next".
- On your source phone, you will see a list of data types that you can transfer.
- Select "Photos" and tap "Next" to start the transfer process.
Drawbacks:
- Both devices need to be connected to the same Wi-Fi network.
- Compatibility and stability vary depending on the devices.
In a Nutshell
To wrap up, in terms of efficiency, professionalism, and comprehensive performance, Phone Transfer is comprehensively superior to the other five methods or tools. And it is also the most desirable tool if you wish for direct, worry-free transfers. Finally, an additional tip here - Before starting the transfer, ensure both your Pixel and iPhone are fully charged and there's enough storage space on the destination device.
Related Articles:
Does Factory Reset Delete Everything on Android/iPhone? In-depth Analysis
How to Transfer Photos from Pixel to Computer/PC? 6 Easy Techniques
Switching from iPhone to Google Pixel in 3 Ways [Professional Guidance]
[2024 Updated] How to Back up iPhone to Computer Efficiently?


