How to Transfer Ringtones from Android to iPhone in 4 Ways? Detailed Guide
"Hello everyone! I recently changed a work phone from Android to iOS and have saved the ringtones from the Android on my PC. They appear to be MP3 files; when I drag them to iTunes, naturally, they appear only in the music tab. How to transfer ringtones from Android to iPhone?" -- from Apple Support Community
Usually, transferring personalized ringtones from one device to another holds significant appeal. However, despite the convenience offered by various migration tools, it's important to acknowledge a notable limitation: the official Move to iOS app cannot transfer ringtones from an Android to an iPhone. This discrepancy arises due to the differing formats and lengths of ringtones between these devices, rendering the migration somewhat cumbersome.
Amidst this challenge, this page compiles four easy ways to transfer ringtones from Android to iPhone. By exploring these options, you can navigate the know-how of cross-platform data transfer with ease.
- Part 1: How to Transfer Ringtones from Android to iPhone via Google Drive
- Part 2: How to Get Android Ringtones on iPhone Using iTunes
- Part 3: How to Transfer Ringtones from Android to iPhone Device via Email
- Part 4: How to Copy Ringtones from Android to iPhone with SHAREit
- Q&A about Ringtones for Android/iPhone
- Extra: Tips to Transfer Other Files from Android to iPhone
Part 1: How to Transfer Ringtones from Android to iPhone via Google Drive
To transfer music between Android and iPhone, use cloud storage like Google Drive. This service supports various audio file formats, so you can transfer any compatible audio files across devices. To do it, upload songs from your Android, then download them to your iPhone. Besides, this method also works for sharing ringtones between Android and Android.
How to get Android ringtones for iPhones using Google Drive?
- Get the Google Drive app on both Android and iPhone.
- Log in on your Android and tap the "+" icon at the bottom right.
- Select "Upload" to add songs to your Google Drive.
- Sign in on your iPhone using the same credentials.
- You'll find the uploaded songs there.
- Tap the three dots next to a song.
- Choose "Download" to save it to your iPhone's storage.
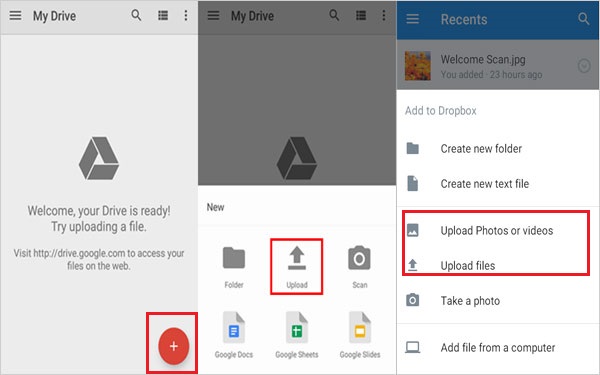
Note: Google Drive imposes certain file size limits, but they are generally generous enough for most audio files used as ringtones. However, it's a good idea to check the file size and ensure it complies with Google Drive's limitations.
You Might Also Like:
Part 2: How to Get Android Ringtones on iPhone Using iTunes
If you prefer not to use a third-party program, you have the option of using the iTunes app to transfer ringtones. However, this method is somewhat more time-consuming compared to previous ones.
Before proceeding, make sure the ringtones you wish to transfer from your Android device are compatible with the iPhone, such as the M4R format. If not, you'll need to utilize a 3rd-party audio converter to convert them to this format. Here's the step-by-step guide:
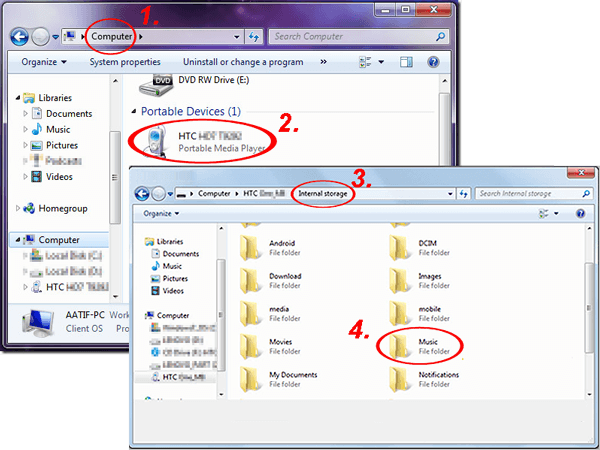
- Connect your Android device to your computer.
- Set "Use USB for" as "File Transfer".
- Transfer the ringtones/music you want to copy to a folder on your computer.
- Open the most recent version of iTunes on your computer.
- Go to "File" > "Add File to Library" or "Add Folder to Library".
- Select the folder containing the converted ringtones.
- Use a USB cord to link your iPhone to your computer.
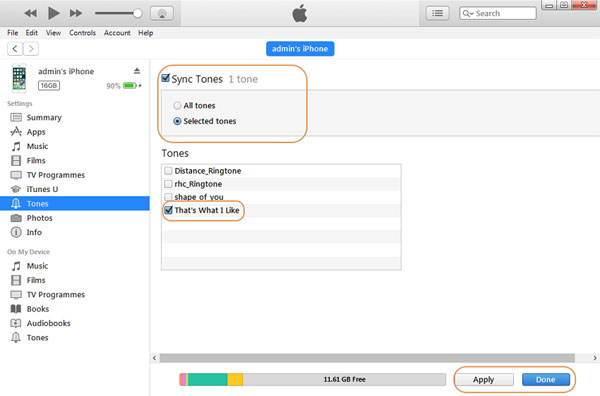
- In iTunes, select your device.
- Go to the "Tones" tab and check the box next to "Sync Tones".
- Select the ringtones you want to transfer to your iPhone and click "Apply" or "Sync".
Part 3: How to Transfer Ringtones from Android to iPhone Device via Email
Email is a simple way to send ringtones from Android to iPhone if they're under 20MB or 25MB. However, you'll need to play them in GarageBand first before using them. Next, send the email with the attached ringtones from your Android and receive it on your iPhone.
How to transfer ringtones from Android to iPhone by Email?
- To begin, navigate to the "File Manager" on your device and find the folder where your ringtones are stored.
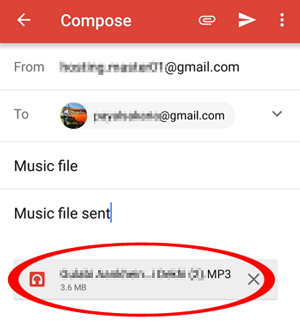
- Once located, select the specific ringtone you want to share and access the sharing options.
- Choose your preferred email service from the sharing menu.
- This will open a new email draft with the ringtone file attached.
- Enter the recipient's email address before sending the email.
- On your other iPhone, open the mail app and save the ringtone from the email you just received.
Click to Explore:
Part 4: How to Copy Ringtones from Android to iPhone with SHAREit
SHAREit is a versatile file-sharing app that allows quick and wireless transfers between Android, iOS, Windows, and Mac devices. With this app, users select their desired ringtones on Android, connect their iPhone to Shareit's hotspot, and swiftly transfer the files. All in all, SHAREit supports simultaneous file sharing and offers high-speed data transfer, providing a convenient solution for cross-platform content sharing. Here's the drill:
- Install SHAREit on the Android device and select files to share with the iPhone.
- SHAREit enables a mobile hotspot on Android.
- Connect the iPhone to this hotspot.
- Once connected, send the files and get them out automatically.
- Ensure a stable connection and wait for it to finish.
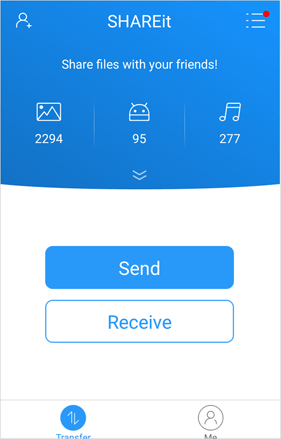
SHAREit allows you to transfer various types of ringtone files, including MP3, M4A, and OGG formats, among others. Again, if you encounter any issues during the transfer, such as connectivity problems or file transfer failures, we recommend restarting the SHAREit app on both devices and ensuring that they are connected to the same Wi-Fi network.
Q&A about Ringtones for Android/iPhone
Q1: Where are ringtones saved on Android & iPhone?
- On Android phones, ringtones are usually stored in the "Ringtones" folder in internal storage or the "Media" folder.
- For iPhones, ringtones are within the system files and accessed through the "Settings" app under "Sounds & Haptics" or "Sounds".
Q2: How can I convert my music to a ringtone format?
- After the ringtone transfer, visit the Online-Convert M4R Converter.
- Upload your music file (in formats like MP3, M4A, or others).
- Optionally, you can trim the audio by specifying timestamps.
- Click “Start” to convert your file to the Apple ringtone format (M4R).
Q3: How can I set a custom ringtone on my iPhone?
iPhone ringtones must be in .m4r format and cannot exceed 30 seconds in duration. To make iPhone ringtones:
- Get GarageBand from the App Store.
- Open GarageBand and select "Audio Recorder".
- Disable "Metronome" and extend the timeline to 30 bars.
- Access the song in the "Files" tab and drag the song to the timeline.
- Trim to the desired start and save the project.
- Share as Ringtone before setting as ringtone in iPhone "Settings".
Q4: How to transfer ringtones from Mac to iPhone?
- Connect your iPhone to your Mac computer via USB.
- Open Finder on Mac and drag the ringtone file to iPhone.
- On your iPhone, head to "Settings > Sounds & Haptics > Ringtone".
- Choose a custom sound as a ringtone.
Extra: Tips to Transfer Other Files from Android to iPhone
The ringtones move from Android to iPhone for personalization or entertainment purposes. Transferring file categories like contacts or photos may be a more rigid and practical need. In this case, you are advised to use a professional and powerful tool - MobiKin Transfer for Mobile (Windows and Mac). As a popular mainstream product in the software market developed by an experienced technical team, MobiKin quickly gained a large number of fans with its stable kernel and easy-to-use performance.
Why Choose MobiKin Transfer for Mobile?
> Swiftly transfer files from Android to iPhone without compromising privacy.
> Smoothly copy data between Android/iOS devices and between Android and Apple devices.
> Work well with data types like contacts, SMS, call logs, songs, videos, photos, calendars, voice memos, docs, books, etc.
> Simple interface, easy to connect, and worry-free results.
> Compatible with overall Android and Apple devices.
How to transfer data from Android to iPhone using MobiKin Transfer for Mobile?
- After installing and launching the utility on your computer, link both your Android and iPhone devices using USB cables.
- Follow the simple hints to let the program recognize your devices.
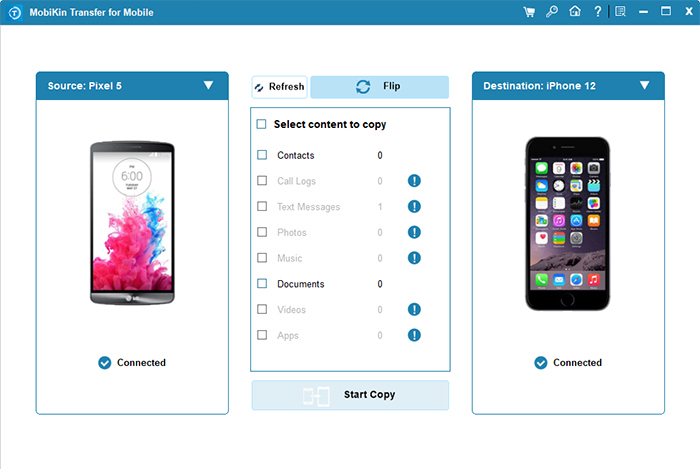
- Once recognized, your Android and iPhone will appear on the left and right sides of the interface, respectively.
- Ensure that the source phone is identified as Android and the destination as iPhone. If not, click "Flip" to switch.
- Select the data you wish to transfer and then click "Start Copy" to begin transferring data from Android to iPhone seamlessly.
Final Words
That's all about the ringtone transfer from Android to iPhone in different ways. While the process may seem daunting at first, the end result - a harmonious blend of familiarity and innovation - is well worth the effort. Finally, a side note here - After transferring the ringtones to your iPhone, make sure to test them to ensure that they sound as expected and are functioning properly. Adjust the volume settings and assign the transferred ringtones to different contacts to verify their functionality.
Related Articles:
[Tested] 10 Solutions to Fix iPhone Transfer Not Working Quickly
6 Best Methods to Transfer Music from Android to Android Quickly
Android Music Backup: Different Ways to Back Up Android Songs
How to Transfer Ringtones from iPhone to iTunes Library? [Way 1 Is the Best]
How to Change Ringtones on iPhone 15/14/13/12/11/X/8/7/6?
3 Solutions to Make MP3 a Ringtone on iPhone with/without iTunes


