How to Avoid iPhone Turn to a Brick When Updating Apple OS?
iOS 9 has been released for a period of time and many people may are eager to upgrade their Apple operating system. The new operating system is attractive and can offer people many fantastic new functions. If you want to updating your iPhone please click here. Unfortunately some iPhone may turn to be bricked after updating to the iOS 9. For example, the iPhone may be extremely hot when you use it or the Wi-Fi cannot be connected. One word the mobile phone just cannot operate as normal as it usually is. Here we will offer you several tips to fix the bricked iPhone or avoid your iPhone to be a bricked iPhone.

Reasons that cause the iPhone to be bricked:
1. Hardware failure.
If the hardware on your iPhone cannot reach the requirements of the iOS 9, your iPhone may be bricked when updating to the iOS 9.
2. Being short of battery.
If your device will be bricked if the battery runs out during the process of updating the Apple operating system.
3. Recovering iPhone from a corrupted backup.
If you recover the iPhone with a corrupted backup, of course your device will be bricked or has some other problems.
4. Jailbreaking
If you have jailbroken your iPhone before, the iPhone may also meet some problem when you updating the operating system.
How to Avoid a Bricked iPhone When Updating the iOS?
No can be sure what problem you may meet. But if you follow the tips below, the possibility of your iPhone becoming a bricked iPhone will be less.
1. Don't plug the USB port of your iPhone to any unreliable power supplies.
2. If you connect to the Wi-Fi when updating to the iOS 9, you should make sure the Wi-Fi is stable.
3. Make sure there is enough space in your device. If you want to update to iOS 9, you need to have at least 2-3 GB free spaces in your device.
How to Fix a Bricked iPhone?
Tip 1. Reset
Sometimes resetting the iPhone can solve all the problem. So just press on the Power button on the top of the device and the Home button simultaneously for a while. And then you will see an Apple logo like the picture shows below. And the iPhone will boot as normal. Connect your iPhone to the computer with a USB cable. Run the iTunes and recover your iPhone with the backup on iTunes.

Tip 2. Enter DFU Mode
Before the beginning, make sure your iPhone has been charged fully in case that your device runs out of battery during the process.
1. Press the Power and Home buttons at the same time until the iPhone is turned off.
2. Tap on the home button and hold it still when you connect the device to the computer with the USB cable.
3. Release the button when you see an interface like this.

4.Finally recover the iPhone with the backup on iTunes.
Related: How to recover deleted files with backup on iTunes?
What Should You Do Before Updating to the iOS 9?
You'd better make a backup of your device before upgrading your operating system to the latest version. Here we recommend you the MobiKin Assistant for iOS (Windows/Mac) as the helper to help you transfer various files like contacts, SMS messages, photos, music, videos and so on from iPhone to computer. Besides, it cannot only support iPhone but also support other types of iOS devices like iPad and iPod. There are detailed steps below to transfer the files from iPhone to computer.
Step 1. Download the software by clicking the icons below and install it on the computer.
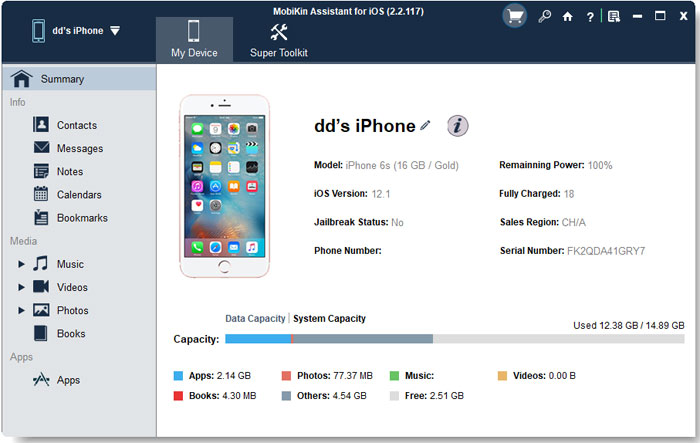
Step 2. Use a USB cable to link your iPhone to PC and run the program. The software will detect your device and you will see an interface like this with many categories list on the left column and the main parameters of your device on the right panel.

Step 3. Click the options on the left panel to preview the details on the right panel. Mark the files you want to transfer on the right panel and hit the Export button on the top panel. All the marked files will be transferred to your computer as a backup.

Related Articles:
Top 6 iTunes Alternative for Android Phones/Tablets in 2023
How to Transfer Music from iTunes to BlackBerry
iPod Won't Sync with iTunes? 10 Easy Solutions to Fix It!
How to Erase or Wipe iPhone without iTunes?


